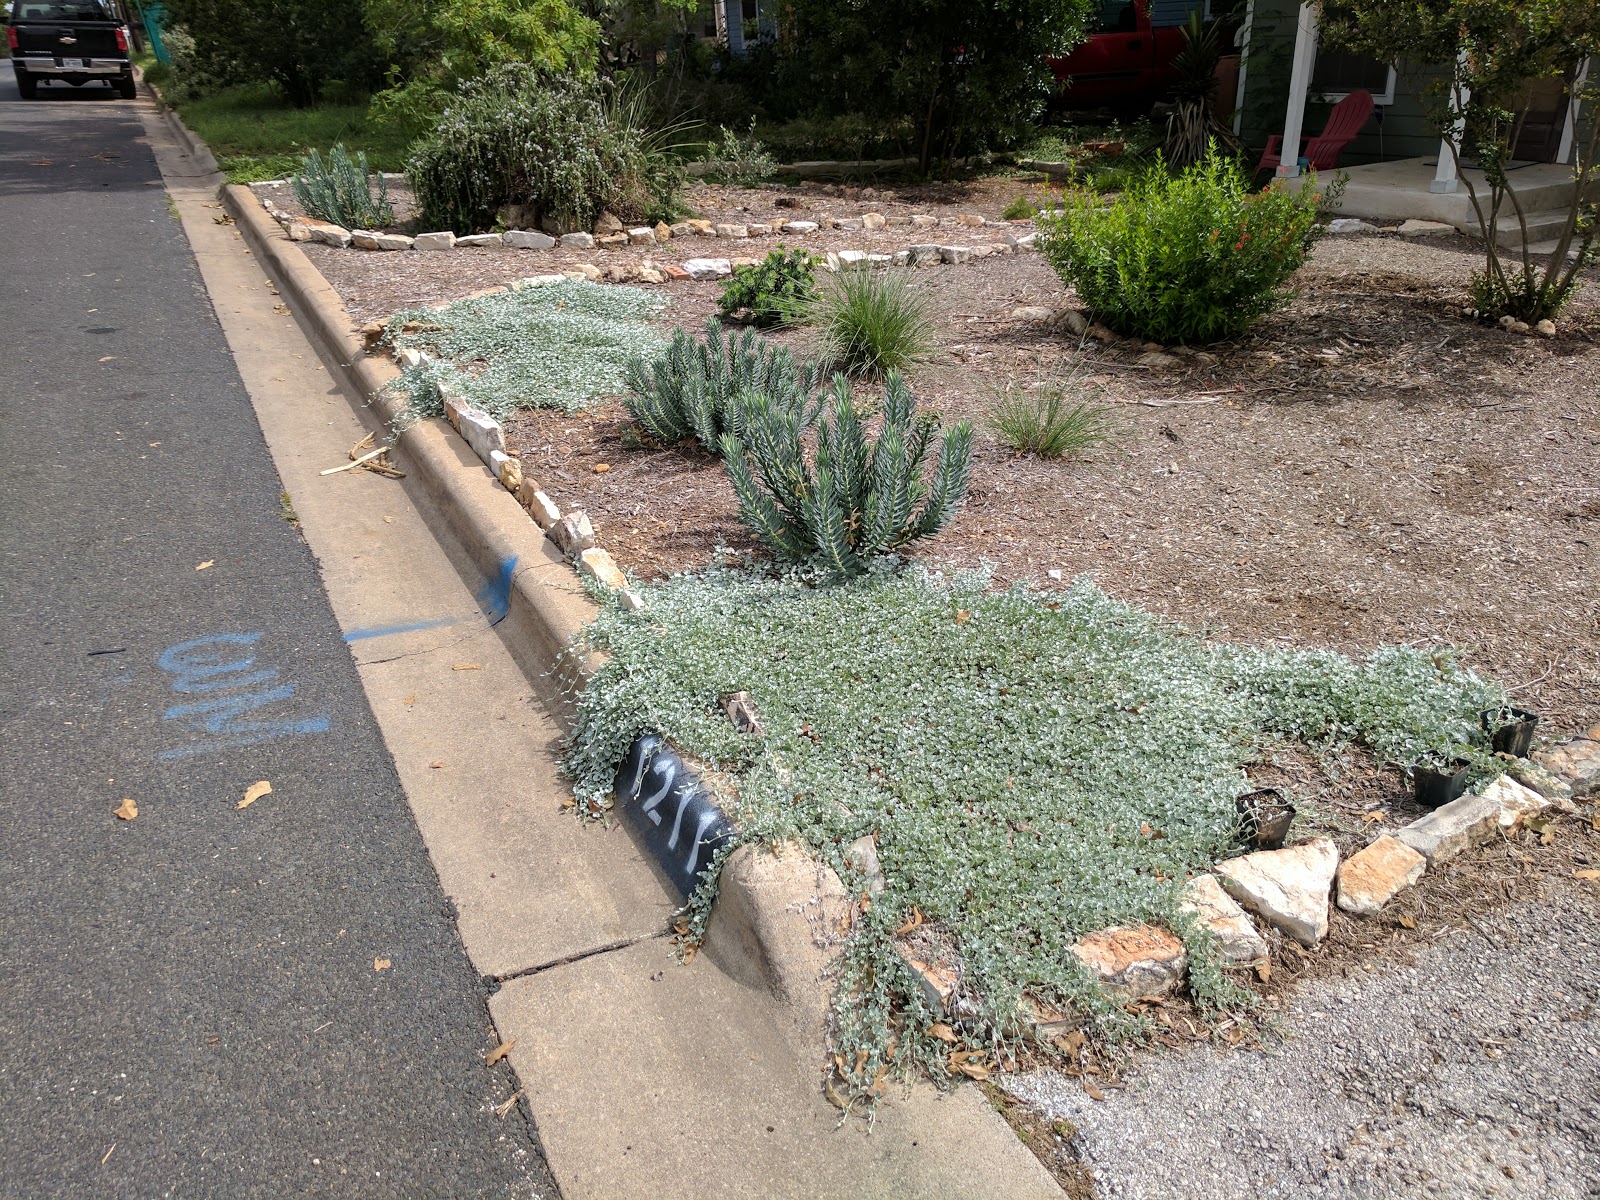
I started gardening a year and half ago with the front yard. It's now time for the backyard. I hired a designer this time, Shab Ashrafi with Tract 15 design. She did a great job. I now have a vision for the yard. Step 1 began today: cutting down the 2 hackberries in the backyard. Stay tuned as I post the design and the progress to the design.
Wednesday, March 7, 2018
Saturday, June 3, 2017
Propagating Silver Ponyfoot
I love my ground cover, Silver Ponyfoot. It is really starting to fill in to the area I planted it, and I won't mind if it takes over the entire garden.
I decided to try and propagate more silver ponyfoot from the plants I already have. I've watched this John Dromgoole native plant propagation video many times, and I applied the technique to my Henry Duelberg sage with success.
But silver ponyfoot is a little different, because it's more like a grass, and it roots as it spreads. I wasn't quite sure what to do, but then I found an amazingly detailed set of directions (scroll down a few responses on that site and you'll find it) on how to propagate Silver Ponyfoot by using the plant's natural rooting habits.
The idea is basically to put your destination pot underneath the plant as it spreads and then be patient. Eventually it will root in your container, and you can cut it away and have a new plant.
So that's what I tried this morning. I used the potting mix recipe in the Youtube video and the technique in the GardenWeb post. It's June in Texas, so it might be too hot and dry for this, but we'll see--maybe it'll work or maybe I'll have to try again in October.
But silver ponyfoot is a little different, because it's more like a grass, and it roots as it spreads. I wasn't quite sure what to do, but then I found an amazingly detailed set of directions (scroll down a few responses on that site and you'll find it) on how to propagate Silver Ponyfoot by using the plant's natural rooting habits.
The idea is basically to put your destination pot underneath the plant as it spreads and then be patient. Eventually it will root in your container, and you can cut it away and have a new plant.
So that's what I tried this morning. I used the potting mix recipe in the Youtube video and the technique in the GardenWeb post. It's June in Texas, so it might be too hot and dry for this, but we'll see--maybe it'll work or maybe I'll have to try again in October.
![]() |
| Using paperclip halves to keep the plant in contact with container soil. |
Friday, March 31, 2017
Free Mulch in Austin!
I have two sources of free mulch in Austin.
1. Austin Resource Recovery
When I have some extra cardboard boxes and I'm heading to south Austin, I'll stop off at the recycling center and pick up some mulch. You fill your own boxes, so bring gloves and/or a shovel. It's fun. The quality is extremely variable. This is shredding from yard waste, so you could get some really nice shredded hardwood, or they might only have some garbage infused unknown plant shreddings.
2. Leaves
This is my primary source for veggie patch mulch and for leaves to go into my compost. There are some beautiful trees on my street, and my neighbors don't mind me taking the leaves.
I collect the leaves in fall, and I store them in my leave storage silo (along with other stuff like paper bags and newspaper).
Then I use the leaves as a mulch in my veggie patch. This will help with soil moisture retention and soil temperature moderation.
1. Austin Resource Recovery
When I have some extra cardboard boxes and I'm heading to south Austin, I'll stop off at the recycling center and pick up some mulch. You fill your own boxes, so bring gloves and/or a shovel. It's fun. The quality is extremely variable. This is shredding from yard waste, so you could get some really nice shredded hardwood, or they might only have some garbage infused unknown plant shreddings.
![]() |
| The path to my front door uses nice mulch I got for free at Austin Resource Recovery |
This is my primary source for veggie patch mulch and for leaves to go into my compost. There are some beautiful trees on my street, and my neighbors don't mind me taking the leaves.
![]() |
| Across the street tree |
![]() |
| Leave storage silo |
![]() |
| Leaves as mulch in my veggie patch. |
Why buy mulch? Maybe you need some beautiful looking mulch in large quantities, and that's a good reason to buy mulch. But if you are just using mulch for small areas or for the veggie patch, then look to free, local sources. I especially like my leaf mulch because I'm trying to reduce my carbon emissions, and the leaf mulch used zero gasoline to get into my garden.
Bluebonnets in bloom and in seed
Here's a quick update on Bluebonnets.
Back in October, I planted bluebonnet seeds in the backyard. That was documented in this post.
It's now late March, and we have got a couple nice patches of bluebonnets in the backyard. Interestingly (although, unsurprisingly), there are a few stray flowers far away from where I distributed the seeds.
From what I've read, the important thing this time of year is ensuring that the flowers go to seed before you mow them to smithereens. However, I've not seen a picture of what that looks like, so I'm posting one.
Back in October, I planted bluebonnet seeds in the backyard. That was documented in this post.
It's now late March, and we have got a couple nice patches of bluebonnets in the backyard. Interestingly (although, unsurprisingly), there are a few stray flowers far away from where I distributed the seeds.
From what I've read, the important thing this time of year is ensuring that the flowers go to seed before you mow them to smithereens. However, I've not seen a picture of what that looks like, so I'm posting one.
![]() |
| On the lower half of the plant, you can see the seed pods forming. |
The important thing (so I've read) is to let the seed pod dry out and turn brown. Only then can you mow down your spent bluebonnet. That will ensure that the seeds are properly developed and will germinate in the ground next year.
I got my seeds from Native American Seed. They germinated at a high rate. I am pleased. I will be buying more seeds in the fall (but this time will go with a wildflower blend rather than the bluebonnet monocrop).
Wednesday, March 22, 2017
Ben's favorite gardening companies in Austin
My Top 3 Austin Nurseries:
3. Tillery Street Plants - The staff here is always friendly, but some of them seem to not be very knowledgeable about their products. The selection is pretty small. But for the East Austin gardener, it's extremely convenient, and that's why it's in my top 3.
2. Great Outdoors - Knowledgeable staff. Big selection. Fun to look around. Bigger selection of planters and pots than Tillery Street. They also carry a lot of soil, mulch etc. that I'm not sure Tillery Street carries.
1. Barton Springs Nursery - THE BEST DAMN NURSERY IN AUSTIN. Super knowledgeable staff. They sell all kinds of native plants. They sell tons of different trees. I bought 1 gallon trees here for $3! Decent selection of planters and pots. Good indoor section where they sell gloves and that kind of paraphernalia. My mom educated me on the fact that this is the place to buy plants in Austin, and I'm a believer.
SIDE NOTE: Natural Gardener - Okay, so you can't have a blog post on Austin nurseries without mentioning the Natural Gardener. I do enjoy the Natural Gardener. I love all the information John Dromgoole puts out (whether on the radio, on KLRU's Central Texas Gardener, or on their website). The staff at the Natural Gardener is knowledgeable. It has a huge selection. Big soil yard with lots of choices. Yada yada yada. It's the grandaddy of them all. But it's a hike to get out there, when you're there you have to fight the crowds. It's fun to go every once in a while, but it just generally ain't my scene.
How about Veggies?
Veggies - This year I went to the Sunshine Gardens spring plant sale. Damn that was awesome. I was amazed by the variety of different kinds of veggies and herbs. That is now my go-to source for veggie transplants.
How about Trees?
Ted's Trees is in East Austin, and since this is an East Austin gardening blog, I should mention Ted's Trees. Ted's a nice guy and very helpful. He's got a bunch of different trees for sale. It's really fun to go walk around on his property. But here's the deal. I'm not really interested in what Ted sells. He sells bigger trees. They are expensive, and that makes them riskier to plant. I think that might interest a house builder or someone who needs to make something look good quickly. But as a gardener, I want to buy a small 1-5 gallon tree and then let it grow into something large. Because it didn't spend so much time in a pot, it will be a healthier tree (and less expensive). I heard on Central Texas Gardener that if you plant a 5 gallon and a 30 gallon tree next to each other, in 5 years they'll be the same size. So why spend money on the 30 gallon? I perfer the tree selection at Barton Springs Nursery and at the Lady Bird Johnson Wildflower Center plant sales, where they sell them younger in smaller pots.
How about soils?
I bought my veggie patch soil from Organics By Gosh. I did a 50/50 soil/compost mix. I can't really speak to quality yet (we'll see how the spring garden goes). But I bought on the recommendation of my next door neighbor, who says quality is decent, it's closer to us (in East Austin), and the price better than the places out west. To save a little extra cash and effort, don't get it delivered, instead hire some high school kids off Craigslist to pick it up for you in their pickup truck and wheel barrow to your veggie patch or yard.
I've also bought rocks from Whittesley soil and stone yard by the airport. They have a huge operation there, so I bet the quality of their soil and compost is just fine. The guy working there has also been really friendly and helpful to me.
It's good to know about these choices as a gardener in East Austin, because you shouldn't need to drive all the way out to SW Austin or Dripping Springs to get your soil and compost. We have sources close by.
Callahans?
As an East Austin gardener, it's good to keep Callahan's in mind as a nearby source for tools and garden supplies that's not Home Depot. People don't know this, but they have a gigantic warehouse in back with tons of garden stuff: tools, rain barrels, etc. I bought my ollas there. Prices can be high here, but I don't mind paying a few extra bucks to keep those dollars local.
Special Mention: Brite Ideas
This place is in South Austin. They are a hydroponics store with a split personality between veggie growers and marijuana growers (although I guess you could be both). The staff here is really nice and helpful. I mention this place because they sell recycled rain barrels for $30!!!! That's a great deal, and I don't think many people are aware they sell those. It's important to me to get my rain barrels recycled, because it takes a lot hydrocarbons to make that big piece of plastic. I feel that I'm lowering my impact on the planet by using a recycled barrel. They also give away compost tea. So kudos to Brite Ideas.
3. Tillery Street Plants - The staff here is always friendly, but some of them seem to not be very knowledgeable about their products. The selection is pretty small. But for the East Austin gardener, it's extremely convenient, and that's why it's in my top 3.
2. Great Outdoors - Knowledgeable staff. Big selection. Fun to look around. Bigger selection of planters and pots than Tillery Street. They also carry a lot of soil, mulch etc. that I'm not sure Tillery Street carries.
1. Barton Springs Nursery - THE BEST DAMN NURSERY IN AUSTIN. Super knowledgeable staff. They sell all kinds of native plants. They sell tons of different trees. I bought 1 gallon trees here for $3! Decent selection of planters and pots. Good indoor section where they sell gloves and that kind of paraphernalia. My mom educated me on the fact that this is the place to buy plants in Austin, and I'm a believer.
SIDE NOTE: Natural Gardener - Okay, so you can't have a blog post on Austin nurseries without mentioning the Natural Gardener. I do enjoy the Natural Gardener. I love all the information John Dromgoole puts out (whether on the radio, on KLRU's Central Texas Gardener, or on their website). The staff at the Natural Gardener is knowledgeable. It has a huge selection. Big soil yard with lots of choices. Yada yada yada. It's the grandaddy of them all. But it's a hike to get out there, when you're there you have to fight the crowds. It's fun to go every once in a while, but it just generally ain't my scene.
How about Veggies?
Veggies - This year I went to the Sunshine Gardens spring plant sale. Damn that was awesome. I was amazed by the variety of different kinds of veggies and herbs. That is now my go-to source for veggie transplants.
How about Trees?
Ted's Trees is in East Austin, and since this is an East Austin gardening blog, I should mention Ted's Trees. Ted's a nice guy and very helpful. He's got a bunch of different trees for sale. It's really fun to go walk around on his property. But here's the deal. I'm not really interested in what Ted sells. He sells bigger trees. They are expensive, and that makes them riskier to plant. I think that might interest a house builder or someone who needs to make something look good quickly. But as a gardener, I want to buy a small 1-5 gallon tree and then let it grow into something large. Because it didn't spend so much time in a pot, it will be a healthier tree (and less expensive). I heard on Central Texas Gardener that if you plant a 5 gallon and a 30 gallon tree next to each other, in 5 years they'll be the same size. So why spend money on the 30 gallon? I perfer the tree selection at Barton Springs Nursery and at the Lady Bird Johnson Wildflower Center plant sales, where they sell them younger in smaller pots.
How about soils?
I bought my veggie patch soil from Organics By Gosh. I did a 50/50 soil/compost mix. I can't really speak to quality yet (we'll see how the spring garden goes). But I bought on the recommendation of my next door neighbor, who says quality is decent, it's closer to us (in East Austin), and the price better than the places out west. To save a little extra cash and effort, don't get it delivered, instead hire some high school kids off Craigslist to pick it up for you in their pickup truck and wheel barrow to your veggie patch or yard.
I've also bought rocks from Whittesley soil and stone yard by the airport. They have a huge operation there, so I bet the quality of their soil and compost is just fine. The guy working there has also been really friendly and helpful to me.
It's good to know about these choices as a gardener in East Austin, because you shouldn't need to drive all the way out to SW Austin or Dripping Springs to get your soil and compost. We have sources close by.
Callahans?
As an East Austin gardener, it's good to keep Callahan's in mind as a nearby source for tools and garden supplies that's not Home Depot. People don't know this, but they have a gigantic warehouse in back with tons of garden stuff: tools, rain barrels, etc. I bought my ollas there. Prices can be high here, but I don't mind paying a few extra bucks to keep those dollars local.
Special Mention: Brite Ideas
This place is in South Austin. They are a hydroponics store with a split personality between veggie growers and marijuana growers (although I guess you could be both). The staff here is really nice and helpful. I mention this place because they sell recycled rain barrels for $30!!!! That's a great deal, and I don't think many people are aware they sell those. It's important to me to get my rain barrels recycled, because it takes a lot hydrocarbons to make that big piece of plastic. I feel that I'm lowering my impact on the planet by using a recycled barrel. They also give away compost tea. So kudos to Brite Ideas.
Monday, March 20, 2017
How about that ornamental garden?
It's been a very long time since you've heard anything about my ornamental garden in the front yard.
A quick review to get you up to speed:
In summer, I solarized the lawn.
In fall, I put down a compost soil mix and then mulch on top of that.
Soon after that planted a bunch of beautiful plants.
I planted:
-gopher plant
-silver ponyfoot
-indigo spires sage
-Henry Duelburg sage
-Berkeley sedge
-blue grey sedge
-lindheimer muhly
-pride of barbados
-red yucca
-firebush
-arbequina olive tree
-firecracker fern
-ghost plant
So what happened over winter?
Old man winter murdered the pride of barbados, 2/3 firecracker ferns, and all the indigo spires sage.
Old man winter tried his best on the Henry Duelberg sage, silver ponyfoot, and the firebush, but the roots survived, and they are growing quickly this spring.
Everybody else had no problem with the temperature.
Obviously there are some blank spots in the garden now. I am resisting the temptation to fill in those blank spots. I will allow the plants to grow into their mature size before filling in the gaps. Every day I walk into the garden excited to see the newest growth or changes. It's an exciting time in the young garden. Come next fall, I will take stock of how the garden has matured, then put some new plants in.
I did a lot of studying of garden design before starting my garden. This town has some amazing gardens, and many have distinctive styles. When planning our garden, Christine told me she wanted a wild looking garden. I like the wild look, but I need some order and hard lines to provide some contrast and visual foundation/starting point. As I look at my garden today, I see that I utterly failed at that.
I grouped plants well in terms of size, but I did not do well in terms of shape, color, and texture. The cool thing about gardening is THAT'S OKAY! I left myself gaps, and more gaps were created when winter killed some plants. I now have room to evolve this garden into more of what we want for our garden. It's so hard to not run to the nursery and get plants to fill those gaps now, because there's some hazy vision for what I want to achieve with my garden. But I am going to be patient and let the garden develop itself over this spring and summer before I insert myself.
A quick review to get you up to speed:
In summer, I solarized the lawn.
In fall, I put down a compost soil mix and then mulch on top of that.
Soon after that planted a bunch of beautiful plants.
I planted:
-gopher plant
-silver ponyfoot
-indigo spires sage
-Henry Duelburg sage
-Berkeley sedge
-blue grey sedge
-lindheimer muhly
-pride of barbados
-red yucca
-firebush
-arbequina olive tree
-firecracker fern
-ghost plant
So what happened over winter?
Old man winter murdered the pride of barbados, 2/3 firecracker ferns, and all the indigo spires sage.
Old man winter tried his best on the Henry Duelberg sage, silver ponyfoot, and the firebush, but the roots survived, and they are growing quickly this spring.
Everybody else had no problem with the temperature.
Obviously there are some blank spots in the garden now. I am resisting the temptation to fill in those blank spots. I will allow the plants to grow into their mature size before filling in the gaps. Every day I walk into the garden excited to see the newest growth or changes. It's an exciting time in the young garden. Come next fall, I will take stock of how the garden has matured, then put some new plants in.
I did a lot of studying of garden design before starting my garden. This town has some amazing gardens, and many have distinctive styles. When planning our garden, Christine told me she wanted a wild looking garden. I like the wild look, but I need some order and hard lines to provide some contrast and visual foundation/starting point. As I look at my garden today, I see that I utterly failed at that.
I grouped plants well in terms of size, but I did not do well in terms of shape, color, and texture. The cool thing about gardening is THAT'S OKAY! I left myself gaps, and more gaps were created when winter killed some plants. I now have room to evolve this garden into more of what we want for our garden. It's so hard to not run to the nursery and get plants to fill those gaps now, because there's some hazy vision for what I want to achieve with my garden. But I am going to be patient and let the garden develop itself over this spring and summer before I insert myself.
Sunday, March 19, 2017
It's spring and I'm back!
Pardon my absence. I have not been idle in the garden. I just haven't summoned the desire to sit down on the computer and document my work.
But it's a pleasant Sunday morning. I'm lying on the inflatable couch on my back porch with the laptop. The veggie patch is watered. The shed is clean. The house is organized. Time to catch this blog up.
First, the veggie patch-
My last post was early January, documenting the construction of my backyard raised garden bed for veggies. I immediately planted rainbow chard, arugula, kale, and carrots from seed. It was basically a giant failure. Nothing got much bigger than an inch. I started some broccoli and cabbage indoors for transplanting. Same story. The arugula, carrots, and chard and still struggling along in the bed, but they just seem stunted in growth. I don't know if it's the soil, the light, too much/too little watering. It's not clear. But until it's time to plant okra, I'll just keep them there to see what happens.
More importantly, I planted the spring garden in the past month. February was so warm, and so I bought two tomato plants (San Marzano and a big slicer) from Tillery Street Plants (not a great selection, but they were cheap and it's close by my house) and put them in sometime in mid February. It was an inexpensive gamble for an early spring tomato harvest. No freezes since I planted them, so I think the gamble paid off!
On March 4, I went to the Sunshine Gardens Spring Plant Sale and picked up another tomato (Super Marzano), a tomatillo, and an eggplant (Feng yuan variety). I planted those in my raised bed, along with some seeds I bought online this winter. I planted two kinds of basil (not in raised bed, in a big pot), Persian cucumbers, zucchini, and green beans. The green beans and basil are from Baker Creek. The zucchini is from a Burpee seeds stand at Home Depot. The cucumbers were harder to find, but I snatched them from Renee's Garden. I am excited about the Persian cucumbers, because I think they're the same kind I eat when I visit my family in Israel. They are smaller than the one we normally eat here in the US, and they are extremely crunchy. Sometimes they sell them at Central Market, but I'm excited to have my own supply.
That's my update from the veggie patch. I'm excited to see how this spring garden pans out. A month or so in and so far so good! The early-planted tomatoes are growing, and the seeds have all germinated. Some are putting on first leaves. I will keep the blog updated as the garden progresses.
Stay tuned. The next post will be my ornamental garden (front yard) Spring update.
But it's a pleasant Sunday morning. I'm lying on the inflatable couch on my back porch with the laptop. The veggie patch is watered. The shed is clean. The house is organized. Time to catch this blog up.
First, the veggie patch-
My last post was early January, documenting the construction of my backyard raised garden bed for veggies. I immediately planted rainbow chard, arugula, kale, and carrots from seed. It was basically a giant failure. Nothing got much bigger than an inch. I started some broccoli and cabbage indoors for transplanting. Same story. The arugula, carrots, and chard and still struggling along in the bed, but they just seem stunted in growth. I don't know if it's the soil, the light, too much/too little watering. It's not clear. But until it's time to plant okra, I'll just keep them there to see what happens.
More importantly, I planted the spring garden in the past month. February was so warm, and so I bought two tomato plants (San Marzano and a big slicer) from Tillery Street Plants (not a great selection, but they were cheap and it's close by my house) and put them in sometime in mid February. It was an inexpensive gamble for an early spring tomato harvest. No freezes since I planted them, so I think the gamble paid off!
On March 4, I went to the Sunshine Gardens Spring Plant Sale and picked up another tomato (Super Marzano), a tomatillo, and an eggplant (Feng yuan variety). I planted those in my raised bed, along with some seeds I bought online this winter. I planted two kinds of basil (not in raised bed, in a big pot), Persian cucumbers, zucchini, and green beans. The green beans and basil are from Baker Creek. The zucchini is from a Burpee seeds stand at Home Depot. The cucumbers were harder to find, but I snatched them from Renee's Garden. I am excited about the Persian cucumbers, because I think they're the same kind I eat when I visit my family in Israel. They are smaller than the one we normally eat here in the US, and they are extremely crunchy. Sometimes they sell them at Central Market, but I'm excited to have my own supply.
![]() |
| A seedling popping up. (I can't remember but I think it's the cucumber) |
That's my update from the veggie patch. I'm excited to see how this spring garden pans out. A month or so in and so far so good! The early-planted tomatoes are growing, and the seeds have all germinated. Some are putting on first leaves. I will keep the blog updated as the garden progresses.
Stay tuned. The next post will be my ornamental garden (front yard) Spring update.
Monday, January 9, 2017
Building Cedar Raised Beds For My Veggie Patch
I had time off over Christmas and New Years, which gave me time to build my veggie patch. It was a fun process. Here are a few pictures of it coming together.
Update in March 2017- I got concerned that the raised bed was starting to bow out, so I added two more cross bars. Now there's a cross bar every 4 feet. I think that's sufficient. I had to dig out the soil to add them cross bars. I did right before planting the spring garden, so there were no plants or roots to worry about harming. I feel a lot better about the long-term sturdiness of my raised bed with the additional cross bars.
![]() |
| Fully assembled. I added those cross bars to prevent bowing under the weight of the soil, but I think I should have added a few more. Time will tell, and I can add more later. |
Update in March 2017- I got concerned that the raised bed was starting to bow out, so I added two more cross bars. Now there's a cross bar every 4 feet. I think that's sufficient. I had to dig out the soil to add them cross bars. I did right before planting the spring garden, so there were no plants or roots to worry about harming. I feel a lot better about the long-term sturdiness of my raised bed with the additional cross bars.
Monday, December 5, 2016
Early December: My only bloomers
It's early December, and I currently only have two plants in bloom. One is our massive rosemary bush, and the other is a rogue lantana that popped up in my neighbor's land, but spills over into my garden.
We're due for a freeze on Wednesday, and I wonder if the blooms will go away after the freeze.
![]() |
| Lantana on the left, leaning over from the neighbor's land into my garden (no complaints). |
![]() |
| Close up on the pink and yellow blooms. I think it's a very pretty color combo. |
![]() |
| The monster rosemary (I will prune in spring, but I'm afraid to prune it now because the winter freezes might damage it) |
![]() |
| Nice flowers if you look at the rosemary up close. |
Sunday, December 4, 2016
Christmas Lights and a photo of the entire front yard garden
Today was a big first for me. I hung up Christmas lights. It wasn't as fun as I imagined as a kid.
Here's a photo of the lights and our pink lawn poodle that Christine's Aunt Peggy gave us.
I think this photo is the first one I've posted that shows the garden in its entirety. Winter is kind of a drag. The plants are putting in good roots, but they aren't showing me much to enjoy. I cannot wait for spring, when the plants will all burst to life and color.
Here's a photo of the lights and our pink lawn poodle that Christine's Aunt Peggy gave us.
I think this photo is the first one I've posted that shows the garden in its entirety. Winter is kind of a drag. The plants are putting in good roots, but they aren't showing me much to enjoy. I cannot wait for spring, when the plants will all burst to life and color.
![]() |
| Daytime, after I put up the lights (with a view of the garden) |
![]() |
| Illuminated |
Neighborhood Fauna: Blue
This post is the first in an occasional series I shall call "Neighborhood Fauna." Today we feature Blue. Blue is a big puppy from down the street. He likes to jump in my face when I bend over to weed. He is a sweetheart but he's damn annoying.
![]() |
| This is Blue. He is contemplating which of my plants to destroy and how. |
![]() |
| When Blue walks around in my garden, he likes to destroy my plants by trampling on them. |
![]() |
| You can see in this photo that Blue also likes to destroy my plants by ripping pieces off them. |
![]() |
| Blue's favorite garden activity to do is to take giant dumps. |
Thursday, November 24, 2016
How are my plants six weeks on?
I put most of my plants in six weeks ago. That was documented in yesterday's post. So how are my plants doing after six weeks of warm fall weather?
The happiest plants are definitely the silver ponyfoot. It is starting to grow in volume and send some runners out. I built the rock border on the curb and driveway in the hope that the silver pony foot will drape over it and get a nice color contrast with the limestone.
![]() |
| Silver ponyfoot filling out. |
The indigo spires are also really happy. They have put on a few stalks and grown a ton of leaves. They are getting so top heavy that they flop over.
![]() |
| Indigo spires putting on size and getting floppy. |
RIP ghost plant. Blue, the neighbor dog, demolished one of my tiny ghost plants with one strike of his paw. There are still two ghost plants growing. One has a beautiful shape and purple color, and the other is struggling along. One concern I have for them is that my Eat Austin soil might not drain quickly enough for them, and the roots will rot. We'll see, and I'll update.
![]() |
| Happy ghost plant. |
![]() |
| Struggling ghost plant. |
![]() |
| Gopher plant seems like it's happy, but I'm not too sure. |
I got my lindheimer muhly's for a dollar on sale at Barton Springs nursery. They did not look so hot when I bought them, but they were cheap. Still not looking too hot now, but there is the occasional hint of green. Hopefully all the action is happening below the ground, and it is establishing itself. If they doesn't make it, no big loss. I bought 3 for whopping $3.
![]() |
| Not so happy lindheimer muhly. |
My berkeley sedge and firecracker fern look about the same as when I planted them. I'm glad they're not dead, but I hope they start to put on some size eventually.
![]() |
| Unchanged berkeley sedge and firecracker fern. |
I got these blue grey sedges (back corner of the garden) (can't seem to find much about it online) for cheap on sale at Barton Springs Nursery with the lindheimer muhly. It was also not in peak condition. It does not appear to have a changed at all since planting. Same size, no color difference. I hope it takes off eventually, because it's got a great color. The fire bush has done well. It was really thirsty for the first few weeks. The leaves would get really limp, so I watered it a lot. That surprised me since I read they are very drought tolerant. Since we got the rain a few weeks ago, I haven't watered it, and it looks happy, so I think this one is doing well now.
![]() |
| Blue grey sedge is plodding along, but fire bush seems to be doing well. |
Wednesday, November 23, 2016
Initial planting
I put in most of my plants around the beginning of October. Here are some shots of what I put in. Apologies for the camera quality. I got a new phone recently, so that won't be a problem anymore. You can see that I started with a big rosemary and flame acanthus. Also an amazing mountain laurel and a crape myrtle (not my favorite, but Christine likes the flowers and wants to keep it).
![]() |
| A couple of red yuccas, two tiny ghost plants, and a gopher plant are seen here. |
![]() |
| Some silver ponyfoot, gopher plants, a tiny ghost plant, indigo spires sage, lindheimer muhly, and dwarf bottlebrush in this shot. |
![]() |
| Berkeley sedge in back, and some unhappy firecracker fern that I moved from containers to the ground. |
![]() |
| Inidigo spires sage and in back fire bush. |
Monday, November 21, 2016
Bermuda grass: an update
My war against the bermuda grass is proceeding nicely. As mentioned in a previous post, I solarized the yard late this summer, and since then things have been under control. A few spears of grass pop through the mulch each day, but I pull those out, and everything is good.
Well, we got some nice rain here in Austin a few weeks ago, and the advantage shifted to the bermuda grass. A ton of it popped up in some localized areas. The interesting thing is that it popped up in the areas that were not well solarized. The worst area, seen below, was hard to cover with plastic, because there was a dying red oak tree (you can see the stump) there. It makes me feel good that the areas with good solarizing did not experience a return of bermuda.
![]() |
| There are simply too many blades of grass to pull every one. |
Time for solarizing round two. I'm using a black plastic this time, because it's what I happen to have in the shed. This should wipe out my biggest problem area.
The borders of my garden are also vulnerable to bermuda grass. The bermuda grass is really dense right up next to my garden, and so I'm seeing that it can easily spread into the my mulched garden area. That's not my land, so I'm not going to try and solarize that.
My solution is to define the border of the garden with rocks. Now it makes weeding a much simpler task. If I see bermuda on my side of the rocks, I'm pulling it. Building my rock border is going to take some time, because my rock supply (left over from previous owners of the house) is dwindling. Luckily my friend Bob has a ranch in Blanco, so I can slowly rebuild by supply with rocks I find when I visit out there.
![]() |
| My new rock border between my garden and the neighbor's small strip of abundant bermuda grass (I don't knock them for having the bermuda. Not everyone wants to wage a war on it like I do). |
Saturday, November 19, 2016
Gardens are different in San Francisco
I went to San Francisco for a conference last week. It was my first trip away from Austin since I started my garden, and I found out how fun it is to observe new plants and new gardening styles in a different place.
A few discoveries...
San Francisco is all about hedges. Everybody there makes their bushes into hedges. I think it can look cool, but it's not what I'm going for in my garden. Here's a shot of a pretty amazing hedge:
Similar to the hedges, they really go for a manicured look over there. Here are some grotesque trees that appear to get constantly cut back for a certain look and size.
A few discoveries...
San Francisco is all about hedges. Everybody there makes their bushes into hedges. I think it can look cool, but it's not what I'm going for in my garden. Here's a shot of a pretty amazing hedge:
Similar to the hedges, they really go for a manicured look over there. Here are some grotesque trees that appear to get constantly cut back for a certain look and size.
There are a couple of plants I saw all over that are gorgeous. One of them is this yucca tree looking thing. It seems like it would be right at home in Austin. The other are these large trees with long leaves. They are like jumbo olive trees, and they are very attractive.
In the city, space is limited, and people do some cool mini gardens. I spotted some really cool succulent gardens, which were a surprise, because I don't think of San Francisco as having a climate for a succulent garden. However, when I looked it up, Austin gets 10 more inches of rain per year than San Francisco, so it makes sense (SF) (AUS).
Thursday, October 27, 2016
Bluebonnets
About a week ago, I planted bluebonnet seeds in a sunny strip along the fence in the backyard.
I used seeds from Native American Seed company. The pack cost about 20 bucks, and the label stated it was enough seed for 50-100 square feet. I had read that it's a good idea to get seeds inoculated with rhizobium. As I understand it, rhizobium helps the seed fix nitrogen from the air, helping the plant grow. When I emailed them, Native American Seed told me their seeds aren't inoculated:
Our Bluebonnets have not been inoculated or scarified. We sell them just how The bluebonnets go to seed in the wild.I don't really know what to make of that, so I just decided not to worry about inoculation.
I started by weed whacking the planting area down to the dirt. Then I tossed the seeds out over my area. I stomped my feet up and down the area to push the seeds into the dirt. And finally, I hung some twine (barely visible in the photo) to indicate to our yard guy not to mow there.
Here's the before photo, taken from our porch. In the spring I'll post the after photo. The area is definitely larger than the 100 square feet on the label, but I hope the flowers come in well from my top-notch planting job.
![]() |
| Bluebonnet seeds are planted in the dirt strip on the left. |
EDIT March 2017: Here's an updated on my planting: http://eastaustingardener.blogspot.com/2017/03/bluebonnets-in-bloom-and-in-seed.html
Subscribe to:
Posts (Atom)